Guide · Section 2
Choosing the Right Mode
The Material Export Mode dropdown at the top of the export dialog controls which exporter runs.
Export Modes
| Mode | What it does |
|---|---|
| Auto | Inspects your scene and attempts to pick the best path |
| Standard 3MF | Always uses the spec-compliant single-model exporter |
| Paint Segmentation | Forces segmentation export for multi-material painting |
Auto scans the scene and picks a path based on what it finds. MMU paint textures trigger the Orca exporter. Objects with passthrough Materials Extension data (textures, PBR, multiproperties from a previous import) use Standard for a clean round-trip. Objects with plain material slots also use Standard. Geometry-only objects use Standard with no material data.
Standard Export
Standard export writes a single 3D/3dmodel.model file inside the archive — exactly what the 3MF Core Specification describes. Use it when:
- You're sending to a print service or a slicer that expects plain 3MF
- You're round-tripping a file that already has Materials Extension data (textures, PBR, colorgroups) and want to preserve it cleanly
- You just need geometry exported and don't have any multi-material paint data
If your scene has MMU paint textures and you want to export color zones for Orca or PrusaSlicer, that's covered in Multi-Color Export instead.
Export Options
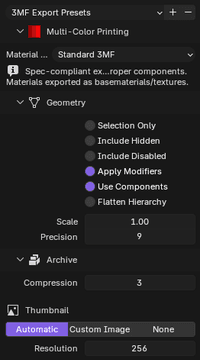
Standard choices
- Selection Only — When on, only the currently selected objects export. Useful when you need to pull one part out of a busy scene. Off by default.
- Include Hidden — Includes objects hidden in the viewport (the eye icon in the Outliner). Off by default.
- Include Disabled — Includes objects excluded from rendering (the camera icon in the Outliner) and any collections that are excluded from the view layer. Handy for exporting reference geometry you normally keep hidden. Off by default.
- Apply Modifiers — Bakes all Blender modifiers into the mesh before export. The exported geometry matches what you see in the viewport, not the base mesh underneath. On by default.
- Use Components — When multiple objects share the same mesh data — linked duplicates created with Alt+D — they export as a single mesh definition with multiple
<component>references pointing to it. A scene with 50 identical bolts exports the bolt geometry once, not 50 times. Use Components can dramatically reduce file size for assembly-style files. A scene with lots of repeated hardware or repeated decorative parts is the ideal case. Turn this off if your target slicer or print service has trouble reading 3MF component references. On by default. - Flatten Hierarchy — When on, child objects in a component hierarchy write as top-level build items instead of nested components. Some print services and older slicers don't support component hierarchies — this is the fix when that happens. Off by default.
- Scale — Global uniform scale multiplier applied to all exported geometry. Default 1.0.
- Precision — Number of decimal places for vertex coordinates. Default 9, which is lossless for 32-bit float. You'd only lower this to reduce file size — values below 6 start affecting visible geometry on detailed meshes.
Archive Options
These are collapsed by default and rarely need touching.
- Compression — ZIP deflate level. Default 3. Range 0 (no compression, fastest write) to 9 (maximum compression, slowest). For mesh-heavy files the difference between level 3 and 9 is usually small — geometry data has limited redundancy and doesn't compress aggressively past a certain point.
- Thumbnail — The exported 3MF can include a thumbnail image that slicers display in their file browsers.
Option What it does Automatic Renders a clean preview of the scene at export time Custom Image Uses an image open in Blender, or a path to an image file None No thumbnail — smaller archive, nothing to display
Resolution (Automatic only) sets the square pixel size of the render. Default 256px, range 64-1024 in steps of 64. Most slicers display these thumbnails at around 128-256px regardless.
The automatic render works best when you have a reasonable viewport angle set up. If the result looks bad, switch to Custom and use a screenshot instead.
What Gets Exported
Standard export writes everything it can find:
- Meshes and transforms — all visible objects (or selected, if Selection Only is on)
- Component hierarchies — linked duplicates as 3MF
<component>references when Use Components is on - Materials — basematerials, colorgroups, texture images (texture2d/texture2dgroup), PBR display properties, composite materials, multiproperties — all round-tripped faithfully from the original import
- Triangle Sets — if any objects have named triangle sets from the Triangle Sets panel, they export via the
sextension namespace - Scene metadata — Title, Designer, Description, Copyright, ModificationDate, and any custom fields added in the Metadata panel
- Stashed slicer configs — if any config files were preserved from a previous import, they ride along in the archive
Changing the Export Defaults
Every setting in the export dialog can be saved as a default in Edit → Preferences → Add-ons → 3MF → Export tab. Set your preferred compression, thumbnail mode, and modifier behavior once, and the dialog pre-fills from that point on.