Guide · Section 4
Painting or Texture Baking
Instead of assigning colors per-object or per-face, you can paint filament zones directly onto a mesh surface — right across face boundaries, at any resolution you want. You can also convert an existing material or texture into color zones automatically. When you export, those painted regions become the per-triangle segmentation data that Orca Slicer, BambuStudio, and PrusaSlicer read natively.
"MMU" (Multi-Material Unit) is Prusa's name for their filament-switching hardware. It became the common term for any per-texture painting workflow regardless of printer brand.
The paint tools live in the 3MF tab of the N-panel (press N in the 3D Viewport). They only appear in Texture Paint mode — switch modes first, then open the tab.
The panel looks completely different depending on whether the active mesh has been set up for painting yet. If you don't see the filament swatches, you're in the setup state — keep reading from the top.
Before You Can Paint
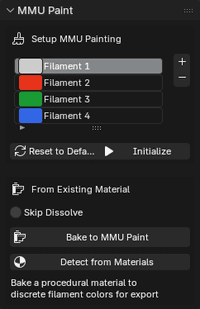
Every new mesh starts with just one button: Create Default Palette. Click it and the full setup panel appears — a 4-slot filament list, preparation options, and the Initialize button.
Filament List
The filament list is the palette you'll paint with. Each slot has a color swatch and a name.
- Add Filament — adds a new slot. Maximum 16.
- Remove Filament — removes the selected slot. Minimum 2.
- Reset to Defaults — resets back to 4 default entries.
Set the colors to match the physical filaments loaded in your printer. These are what get embedded in the exported file and shown in the slicer preview — accurate colors make the preview actually useful.
If your mesh already has materials or textures, Detect from Materials can bootstrap the filament list for you — it analyzes your existing materials and surfaces the colors already present, whether from solid BSDF colors, procedural nodes, or image/PBR textures.
Skip Dissolve
Off by default. During initialization the addon merges flat faces that share nearly the same angle before setting up the painting canvas — giving the texture more usable space on flat surfaces to prevent blurry results.
Turn Skip Dissolve on if you need the original face topology preserved, for example if you have specific face selections you don't want modified.
Texture Size
Chosen automatically based on face count by default. You can override it before clicking Initialize to force a specific resolution.
UV Method
Controls how the mesh surface maps to the painting canvas.
| Option | When to use it |
|---|---|
| Smart UV Project | Default. Clusters connected faces into groups — fewer islands, less wasted space. |
| Lightmap Pack | Gives each face its own rectangle. More isolated, but less space-efficient. |
Initialize Painting
Once the filament list is ready, click Initialize. The addon sets up the UV map and painting texture automatically.
Painting
Once initialized, the panel switches to its active state. The filament list becomes your palette, and three layer buttons appear at the top.

Paint Layers
Three layers can coexist on the same mesh:
| Layer | What it tells the slicer |
|---|---|
| Color | Which filament to use in each region |
| Seam | Where to place or avoid seams |
| Support | Where to force or block supports |
Click a layer button to switch which one you're painting on. Init Seam and Init Support create those layers the first time you click them — after that, clicking them switches to that layer.
Color Zones
Click a swatch to make that filament your active brush color, then paint directly on the mesh in the 3D Viewport.
The default extruder at the top of the list is the base filament — any unpainted region uses it when printing.
The + and - buttons add or remove filament slots. Removing a slot floods every pixel of that color back to the base. Minimum 2 filaments.
Reassign Filament Color — opens a color picker. Confirming it floods every pixel of the selected filament's color to the new one across the entire texture at once. This is how you change a filament color after you've already painted with it.
A feathered brush creates soft edges that blend between filament colors. On export, those blended pixels get rounded to the nearest filament, which can produce unexpected bands at color boundaries. The panel shows a warning if your brush falloff isn't Constant — click Fix Brush Falloff to correct it automatically.
Seam and Support Layers
Switch to the Seam or Support layer and two mode buttons appear:
- Enforce — mark regions where the slicer should place seams or supports.
- Block — mark regions where the slicer should avoid seams or supports.
Paint exactly as you would for colors.
Bake to MMU
If your mesh has a material with gradients, patterns, or a procedural shader that can't be reduced to a handful of solid colors, Bake to MMU converts it directly into a paint texture. It opens its own dialog where you configure the bake and quantization in one step — the output is a finished paint texture ready to export, no manual painting required.
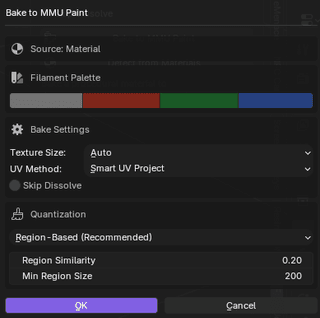
Filament Palette — set the target colors before baking. The tool bakes the material to an image, then quantizes it down to exactly these colors. The closer these are to your actual filament colors, the more accurate the slicer preview will be.
Bake Settings — Texture Size, UV Method, and Skip Dissolve work the same as the standard Initialize options above.
Quantization — the same Region-Based/Per-Pixel method, Region Similarity, and Min Region Size controls from the Cleanup section, applied automatically at the end of the bake.
The tool rewires your material through a temporary emission node and runs a single-cycle bake with its own render settings — your lights, materials, and render configuration are untouched and don't affect the result.
Cleanup
Before exporting, run the Cleanup tools to snap every pixel to the nearest filament color. This removes the soft edges, gradients, and stray pixels that painting tends to leave behind.
Quantization Method
| Method | Best for |
|---|---|
| Region-Based (Recommended) | Most cases — handles soft edges and lighting shadows by grouping connected color patches |
| Per-Pixel | Simple paintings with no gradients or shadows |
Region Similarity
(Region-Based only) How aggressively neighboring pixels get merged. Lower = more detail preserved. Higher = more merging. Default 0.20.
Min Region Size
(Region-Based only) Color patches smaller than this pixel count get absorbed into the surrounding region. Useful for cleaning up speckle near painted edges. Default 200.
Quantize to Filaments
Runs the cleanup pass. The texture updates immediately in the viewport. If the result looks wrong, Ctrl+Z and adjust the settings.
Run Quantize before every export. Even careful painting tends to leave stray pixels near edges — cleaning those up beforehand gives much sharper color boundaries in the slicer and avoids unexpected colors showing up in the wrong places.
Exporting
Export through File → Export → 3D Manufacturing Format (.3mf). Set Material Export Mode to Paint Segmentation (or leave it on Auto) and pick the slicer format for your printer.
The export settings — Slicer Format, Subdivision Depth, Slicer Profile — work the same as for object and face colors. See Object or Face Colors for the full breakdown.